My travel gear
People regularly ask about my travel gear. This is what works for me personally, as a blogger and photographer – it may not work for everyone, and there’ll be different configurations that make sense for different circumstances. I haven’t been paid to endorse any of the products mentioned, but I have received a SCOTTeVEST Q.U.E.S.T. vest for review and been gifted a Rainbird Stowaway Jacket as mentioned below.
I will update this page as needed to reflect changes to my gear. Last updated December 2014.
You may also be interested in my Travel page, which lists my travel blog series.
Travel vest
This was my favourite purchase in 2013.
I bought the SCOTTeVEST Travel Vest (US$125) before my trip to King Island last December. We flew Rex Airlines (Melbourne to King Island) – they have a check-in luggage allowance of 15kg and are strict about the 7kg limit for carry-on (fair enough, as you’re flying on a small plane). As clothes/passengers are not weighed, wearing the vest gave me more options for carrying items other than in check-in and carry-on luggage.
I now can’t imagine going to the airport without wearing my Travel Vest; in fact, I’ve worn it to the airport on every trip since King Island – I carry all my essential items in it – passport, money, boarding pass, etc. If you place money in one of the inside pockets and keep the vest zipped up, it’s practically pickpocket-proof. When going to the airport, I’ll typically carry (in the vest pockets):
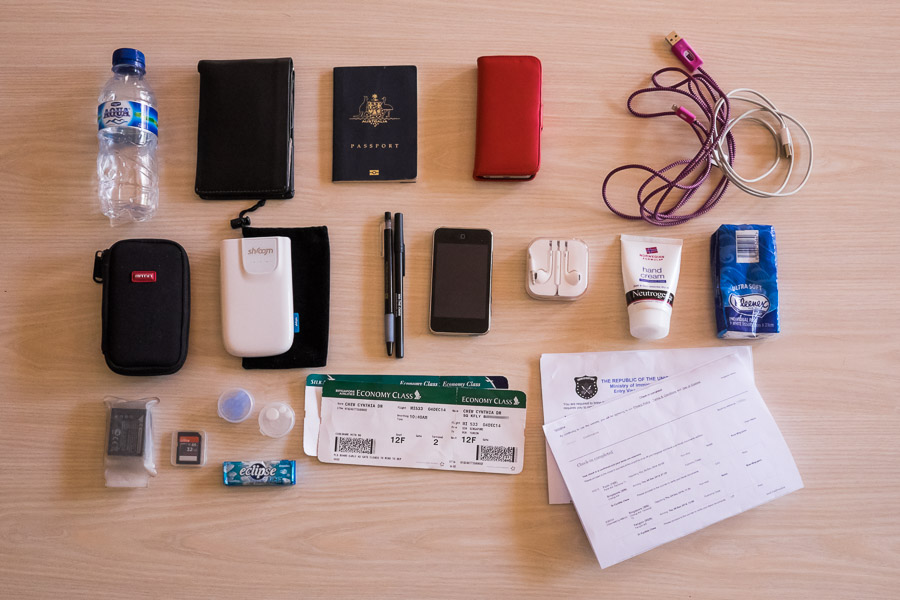 This is typically what I’ll have in my pockets when flying. I can fit even more stuff if needed.
- passport – when in transit, this is kept in its own vest pocket rather than in my wallet for easy retrieval as needed
- wallet (see ‘travel wallet’ below)
- extra pens (there are two spots specifically for pens)
- iPhone
- lip balm
- tissues
- EarPlanes – another essential travel item, I’ve found these ear plugs very effective in helping prevent discomfort/pain in my ears at takeoff and landing
- Chewing gum (I chew gum as part of my routine for take-off and landing – Earplanes helps with the pain/discomfort but I’ve found chewing helps ‘pop’ my ears)
- pill box (actually, a recycled Earplanes plastic case) – for Myanmar, I needed to take my anti-Malaria medication while in transit, and I always carry anti-nausea pills just in case
- spare camera battery
- spare memory card
- iPhone extra battery pack (I currently use a 2-USB port, 6800mAh Shroom battery pack)
- iPod Touch (used exclusively for listening to music so I won’t use up my iPhone’s battery)
- earphones
- iPhone and iPod Touch USB charger cables (I keep these on me so I can easily plug into the USB port in my seat on the plane if there is one. I usually know this ahead of time because I check SeatGuru when selecting my seat on the plane)
- printouts of flight details, notes, maps etc. For Myanmar, I had a copy of my eVisa paperwork to present upon arrival
- boarding pass(es) – kept with the passport
- zip-up case containing my memory cards with my precious photographs
- water bottle – I take an empty bottle through security (I show the security officers) and fill it up for free from a water fountain or tap on the other side. There’s an elastic band in one of the vest pockets to hold a water bottle in place.
There’s a built-in cleaning cloth in one of the breast pockets, perfect for cleaning my glasses or a lens. I could easily carry a camera lens or my portable hard drive in the vest if I needed to reduce the weight of my carry-on bag (though the bigger lenses such as 55-200mm will create a noticeable bulge). I can also carry my iPad in one of the pockets, though I find it more comfortable to carry that in my backpack. A paperback book (not trade edition) is also no problem, but these days I read e-books on my iPad or iPhone.
I love that I have the things I’ll need the most while in transit – right on me. When I’m at the airport, I don’t need to empty my pockets to go through security – I simply take off the vest and pop it in the tray that goes through the x-ray machine – no problems whatsoever. When I’m in my seat on the plane, I don’t need to get up to access my backpack to retrieve things I need during the flight.
I’ve developed my own system for what goes in which pocket, so I’m not constantly digging around trying to find something because I can’t remember which pocket it’s in.
When not travelling, I’ve worn it to events – it’s a great photographer’s vest for events where I haven’t needed to get ‘dressed up’ and can turn up in T-shirt, jeans and vest. It’s especially useful for carrying spare memory cards and batteries – so if I’m on location on a shoot there’s no need for me to dig around my backpack when I need to change batteries or swap memory cards.
I have a second vest, the newer Q.U.E.S.T. Vest for women (US$145), which was sent to me by SCOTTeVEST for review purposes (pictured below).
 Wearing the SCOTTeVEST Q.U.E.S.T. Vest in Margaret River, Western Australia
Photo taken by my partner Jac
The Q.U.E.S.T. Vest is thicker and heavier than the original Travel Vest, but it has more pockets – 42 (Q.U.E.S.T.) vs 17 (Travel Vest). I find the additional pockets of the Q.U.E.S.T. Vest, along with their placement, nicer to use than the 17 pockets of the Travel Vest, but because the Q.U.E.S.T. Vest is made of a heavier, thicker material, it hasn’t been suitable for me to wear to places I travelled to this year. I wore it to the Margaret River region in autumn when the weather was reasonably cool, but I couldn’t wear it in hot humid Singapore. I did not wear the Q.U.E.S.T. vest in Myanmar in December – I wore the Travel Vest. Another feature I’m not as keen on with the Q.U.E.S.T. Vest is the hood, which is rolled up and stored in the vest’s collar. Although a hood is a useful feature, when the Q.U.E.S.T. Vest’s hood is not in use, the collar containing that rolled up hood feels thick and prominent around my neck. I prefer the Travel Vest’s hoodless collar. The Q.U.E.S.T. Vest has inner and outer handwarmer pockets which provide a comfortable place to rest my hands (not necessarily for warming). The Q.U.E.S.T. Vest also has the built-in cleaning cloth in the top right breast pocket.
Jac and my friends have been amazed how much stuff I’ve loaded the pockets up with (Jac doesn’t think I should be encouraged to carry “so much crap” :P). Most of the pockets are on the inside, so you don’t have that typical safari suit look.
SCOTTeVEST doesn’t just make vests; their travel clothing range includes jackets, trousers, and shirts – for men and women. Their products are not cheap, and with no distributor in Australia currently, the online shop is the only option, so shipping costs have to be factored in too. The good news is – they often have discounts and sales, so if your purchase isn’t urgent, I’d suggest signing up to their mailing list to be updated on sales and discount codes – visit the SCOTTeVEST website and scroll to the bottom of the page and click on the ‘Join our List’ link.
Wet weather gear
I’ve been buying Rainbird Stowaway Jackets (AU$70) for years. I discovered them when back when I rode my bicycle to work (15+ years ago!) and needed a lightweight waterproof jacket that I could wear while cycling. Besides keeping me dry, it also keeps me warm and protected from the wind. Jac and I both wear Rainbird Stowaway Jackets regularly as our winter raincoats. I’ve taken my Stowaway Jacket on trips – it was an essential part of my daily gear on King Island. This year, I was glad I’d brought it to Cody, Wyoming, where we photographed cowboys in the rain. I haven’t used it for rain protection in South East Asia – it’s generally too hot and humid there to wear a jacket, though it would’ve been handy to wear on our final early morning boat ride on Lake Inle in Myanmar, when the wind was surprisingly chilly (luckily, there were blankets on the boat). My latest Rainbird Stowaway Jacket is a navy one gifted to me by Rainbird Clothing. They’re based in Victoria, Australia.
 Wearing the Rainbird Stowaway Jacket while photographing birds in the rain on King Island. Photo by Craig Hind
Travel wallet
I got a Bellroy Travel Wallet (warning, auto-play video/audio) as a birthday gift this year. It’s too large for my jeans pockets (back or front) but I love the mini refillable pen, and that it’s big enough to fit my boarding pass and has a dedicated section for my passport – when in transit, it fits nicely in my Travel Vest. It isn’t designed to hold coins, but I carry those in a separate coin purse anyway. Bellroy’s an Australian company, based in Victoria.
Typical wallet contents when I go to the airport (may vary depending on destination):
- Frequent flyer card e.g. Qantas
- Hotel loyalty card(s) – depends of where I’ll be staying
- Credit card(s)
- Medicare card
- My own business cards (I bring a stack with me – the majority goes in my check-in luggage, but I’ll carry a few with me in my wallet)
- Australian money (notes) – for snacks/purchases at departure airport or taxi when coming home
- Currency of destination country (notes) – I can hit the ground running. Note: for Myanmar, I was not able to obtain Burmese currency (Kyat, pronounced ‘chat’) until I reached Myanmar. I’ll be writing more about this in my Myanmar blog series (still to come).
As mentioned in the ‘travel vest’ section above, I store my passport in a separate travel vest pocket on its own while I’m in transit, so it can be more easily retrieved as needed. But when I’m not flying, I keep the passport in the designated section of the wallet.
Backpack
I currently use a Lowepro DSLR Video Fastpack 250 backpack. It’s my carry-on bag and also my day pack on photography tours. When fully loaded going to the airport it typically contains:
- 2 camera bodies (each with a lens attached) – see ‘camera(s)’ below
- 2 more lenses. For my USA and Myanmar trips this year, I had my 23mm lens one on camera, 18-55 lens on the other camera, plus 10-24mm lens and 55-200mm lens in the backpack pockets
- Camera battery charger – see ‘battery chargers’ below
- Portable hard drive
- Spare batteries – see ‘spare batteries’ below
- charger cables for Laptop, iPhone and iPad
- Headlamp and spare batteries – see ‘headlamp’ below
- Power adaptors (in a zip-lock bag) – see ‘power adapters and power board’ below
- My carry-on liquids such as roll-on deodorant/tube of sunscreen, and essential prescription meds (in a zip-lock bag)
- Spare shirt or undies (rolled up)
- My 13-inch laptop and/or iPad (depending on what’s allowed with the airline I’m flying with, I’ll sometimes carry the laptop and its accessories separately in a laptop bag).
- I can also fit the iPad or any of the other small carry-on items (e.g. spare batteries, portable hard drive, headlamp) in my Travel Vest if I need to reduce the backpack’s weight to comply with carry-on limits.
My only complaint about this backpack is a minor one: it comes with a rain cover. It’s easy enough to pull it over the bag when I need to protect it from rain, but I’d much prefer a bag made of fully water-resistant material so I don’t need to think about it. That’s one thing I like about my Crumpler Million Dollar Home messenger bags, which I still use – they’ve been wet from quite heavy rain but my gear’s always been safe and dry inside. For my trips this year (Singapore, USA and Myanmar) I packed a Crumpler 6 Million Dollar Home bag in my check-in luggage to use where the Lowepro backpack was too big/not appropriate.
If it’s a long flight, the backpack goes into the overhead luggage compartment, but on smaller regional jets, it’s fitted under the seat in front of me with no problems whatsoever. As I carry my camera gear in the backpack, I don’t want to check it in – ever.
When going to the airport, I’ll carry as much as possible in the backpack within the 7kg carry-on bag limit. Anything else that I don’t want to check in (especially the smaller items) I will carry in my Travel Vest pockets.
Power adapters and power board
- I have a set of Australian to international plug adaptors by Go Travel. Before a trip, I’ll check which adaptor(s) I need to bring for the country I’m visiting and only bring what I need (I don’t carry the full set). My adaptor allows two devices to be plugged in at once. It doesn’t convert voltage but I haven’t needed that functionality.
- I always bring an Australian power board (power strip) with 4 outlets. My adaptor goes into the wall, the power board is plugged into the adaptor and I plug my electronic gear into the power board. By doing this I can charge up to 4 devices at once, and I can get by in a hotel room that has minimal power points available. The power board I use is made by Jackson and includes 2 USB ports in addition to the 4 outlets. When travelling with Jac, this setup provides enough power outlets for all our electronic devices.
- I take the plug adaptors in my carry-on bag but I pack the Australian power board in my check-in. So even if my check-in bag is lost or delayed in transit, I’ll still be able to charge my electronic devices, albeit fewer at a time.
- You can also get international plug adaptor products that include USB ports, but the ones I’ve seen only provide two prong (non-grounded) outlets. As some of my devices use a prong plug (my laptop, for example), the power board solution described above works best for me. Make sure you check how many prongs your devices’ plugs require before buying an adaptor.
Laptop and portable hard drive
- I recently sold off my DSLR gear and used the money to buy a laptop. I researched laptops for a long time. I was after an ultrabook (or similar) for its portability, but wanted something powerful enough to process photographs on the road. I seriously considered getting a MacBook Air but in the end decided to stick with Windows.
- I bought a Toshiba Kira – key specifications: 13.3 inches, Intel i7 CPU, 8GB ram, Windows 8.1 Pro, 256GB SSD, 3 USB ports, SD card slot, 802.11ac wifi, touchscreen. It’s thin and super light at 1.35kg.
- It came with Adobe Photoshop Elements installed; I’ve added internet security (I use Trend Micro), Adobe Lightroom and Microsoft Office (mainly for Word and Excel).
- The SSD is smaller than I’d like, but other than that, the Kirabook’s got plenty of grunt for photo editing in Lightroom.
- There’s no disc drive, but I haven’t needed to use any discs to install software – I’ve been able to download everything I need.
The laptop’s SSD is small, so I don’t save my photos to it; I bring a portable hard drive (currently using Western Digital My Passport Ultra 2TB) to back up my photos while I’ve travelling. I bring lots of memory cards with me and I don’t delete photos off cards until I get home and have downloaded them to my desktop computer and backup hard drives. So while I’m travelling, I will have two copies of my photos (on memory cards and hard drive).
Phone, sim card
Being connected while travelling is not a priority for everyone but it’s important to me primarily so that I can easily update my social media accounts and check/send emails. Although I try to book at hotels which have (preferably free) wifi, I prefer not to rely solely on wifi for my internet access. Of course, I’ve gone to/stayed in places where there was no internet access – sometimes you don’t have a choice.
My iPhone is unlocked so I can use any mobile carrier’s sim card in it. Before an international trip, I do my research so I know if I can get a local sim card at the destination airport, and if not, where. For example:
- Los Angeles (LAX) – no sim cards for purchase the airport. Yeah, I was surprised! For my solo trip to the US, as I didn’t have my own transportation, there was nowhere convenient for me to get a sim card upon arrival. I used USA Pre-Paid Sim Card to pre-purchase a sim card with a data plan on AT&T so I was all ready to go as soon as I arrived in Los Angeles. This isn’t the cheapest option, but I was willing to pay for the convenience. I used my mobile extensively in the US for making local calls as well as for data/internet.
- Singapore (Changi) – easy peasy! I got a SingTel prepaid sim card at Changi Recommends at Changi Airport.
- Auckland – I bought a prepaid sim from the Telecom shop (now changed to Spark New Zealand) at Auckland Airport.
If switching sim cards while travelling, make sure you have somewhere safe to keep your permanent sim card. I keep mine in a plastic memory card case (where I also keep a spare safety pin which I use to open the iPhone sim tray to change cards) and store it safely with my memory cards.
Camera(s)
I’ve got two camera bodies (Fujifilm X-T1) for two reasons:
- I have a backup if one camera fails. I realise this scenario isn’t likely, but I’d hate to travel so far and be without a camera.
- I can put different lenses on each camera and take both cameras wherever we go. This is particularly useful in situations where I won’t be able to switch lenses safely or quickly – in crowded places, dusty/windy places.
One reason I switched from a DSLR to the smaller mirrorless Fuji X system – it’s much easier for me to carry two lighter cameras than two DSLRs (and their much bulkier, heavier lenses) whether it’s carry-on or a day’s excursion.
Battery chargers
I bring two camera battery chargers so I can charge two batteries simultaneously (important if I’ve been out all day and used up multiple batteries, being able to charge two at a time speeds up the process). One charger goes in my carry-on bag and the other is packed in my check-in luggage. I always keep one charger in my carry-on just in case my check-in luggage gets lost or delayed – my photographic adventures wouldn’t last long without a charger.
Spare batteries
Each camera has a battery. I have three additional spare batteries, which I rotate the usage of. Although mirrorless camera batteries have shorter life than DSLR batteries, I’ve found the Fujifilm camera batteries pretty good. The spares are essential though, for all day shooting. It’s no problem to take spare camera batteries as carry-on luggage; you are not allowed to place batteries in your check-in luggage. I’ve never had any problems carrying multiple spare batteries, either in my Travel Vest pockets or carry-on backpack.
Camera manual
There are still functions I’m not 100% fluent in using, so I bring a copy of the manual with me just in case. I have a PDF copy on my laptop as well as a hard copy in my check-in bag. It is especially helpful if you accidentally activate a setting and have no idea how to get rid of it.
Camera blower/cleaner device
I bury this in with my clothes in my check-in luggage. I use a Vanguard Ultra Lens Cleaner, which is a non-electronic multi-function tool incorporating dust blower, retractable brush and a graphite dispenser for removing oil/smears from lenses.
Tripod
- If I take my tripod on a trip, it always goes into my check-in luggage.
- I currently use a MeFoto Road Trip series tripod – it’s lightweight and compact, designed for travel.
- The tripod itself comes with a carry case but my backpack has a tripod holder so I can strap on the tripod and have my hands free for my camera.
- Personally, I don’t like using a tripod. After this year’s trips where I took the tripod but barely used it, I am considering selling it.
Headlamp
- This has been a very useful item. I first bought it to take to King Island; I’ve taken it on every trip since.
- I don’t necessarily wear it on my head; it works fine held in my hand, as a torch.
- In Cody, Wyoming, I used it to light up the gravel path walking to pre-sunrise breakfast or back in the dark to my cabin in the evening. It was especially handy so I could see (and avoid) horse poo on the trail as I walked in the dark.
- In Myanmar, I used it every evening in Mandalay as we walked post-sunset to restaurants for dinner. Some of the footpaths/sidewalks were poorly lit and quite hazardous at night – they were often uneven or had big holes in them and I could’ve easily fallen or worse, broken an ankle. I also used it to light my way walking to/from sunrise/sunset photo shoots, lighting my way down temple steps in fading light. We experienced a few brief power outages in our hotel in Yangon, and I was glad I had my own light source. The headlamp was in my backpack each day but I kept it at my bedside table each night.
- It uses 2 x AA batteries; I carry two spare batteries with me. Headlamp and spare batteries go in my carry-on luggage.
- The one I use is the Falcon 100 Head Torch, bought on sale from Kathmandu.
Travel checklist
Before I go on a trip, I use a gear checklist to make sure I don’t forget to pack anything (I’ve now got a Word doc template I use). Before I leave a hotel room, I use that checklist to make sure I haven’t left anything behind – I bring a hard copy with me and literally tick things off the list. It’s a low-tech solution but has been 100% effective so far.
Here’s an example checklist. Feel free to use/adapt for your purposes. As you’ll see, it’s pretty basic.
![]() Travel checklist (Word docx, 15KB)
Travel checklist (Word docx, 15KB)
Also see
- My travel blog series
- Terms of use – please read if you want to share or use any of my content
- Disclosure policy